
Closing an Agricultural Waste Loop with Blood Meal: My Recipe for a High Nitrogen Fertilizer
Blog by Sterling Student, Dot Deininger with an Introduction by Director of Communications and Marketing, Julia Vallera, June 2025
Introduction
From day one, students at Sterling dive into hands-on, experiential learning that encourages curiosity, resilience, and a commitment to sustainable, socially responsible living. Our tight-knit community is constantly challenging the status quo by exploring new ideas, perspectives and techniques to create meaningful change.
Sterling Senior Dot Deininger is a great example. Never one to shy away from a challenge, Dot embraced an exciting opportunity this summer after starting a new job. With curiosity, determination, and an eagerness to learn, they elevated the practice of whole-animal utilization by finding innovative ways to honor the animal and minimize waste.
Wanting to share their knowledge, Dot documented the experience in a thoughtful, step-by-step blog post. In it, they walk readers through the process of making Blood Meal, explaining both the practical steps and the deeper value behind the work. As Dot reflects, “I learned a lot about how simple sustainability can be as long as we are willing to learn in this process.”
We are proud to see Dot embodying the problem-solving mindset we cultivate here at Sterling by bringing skills and solutions into the world with purpose. Well done, Dot!
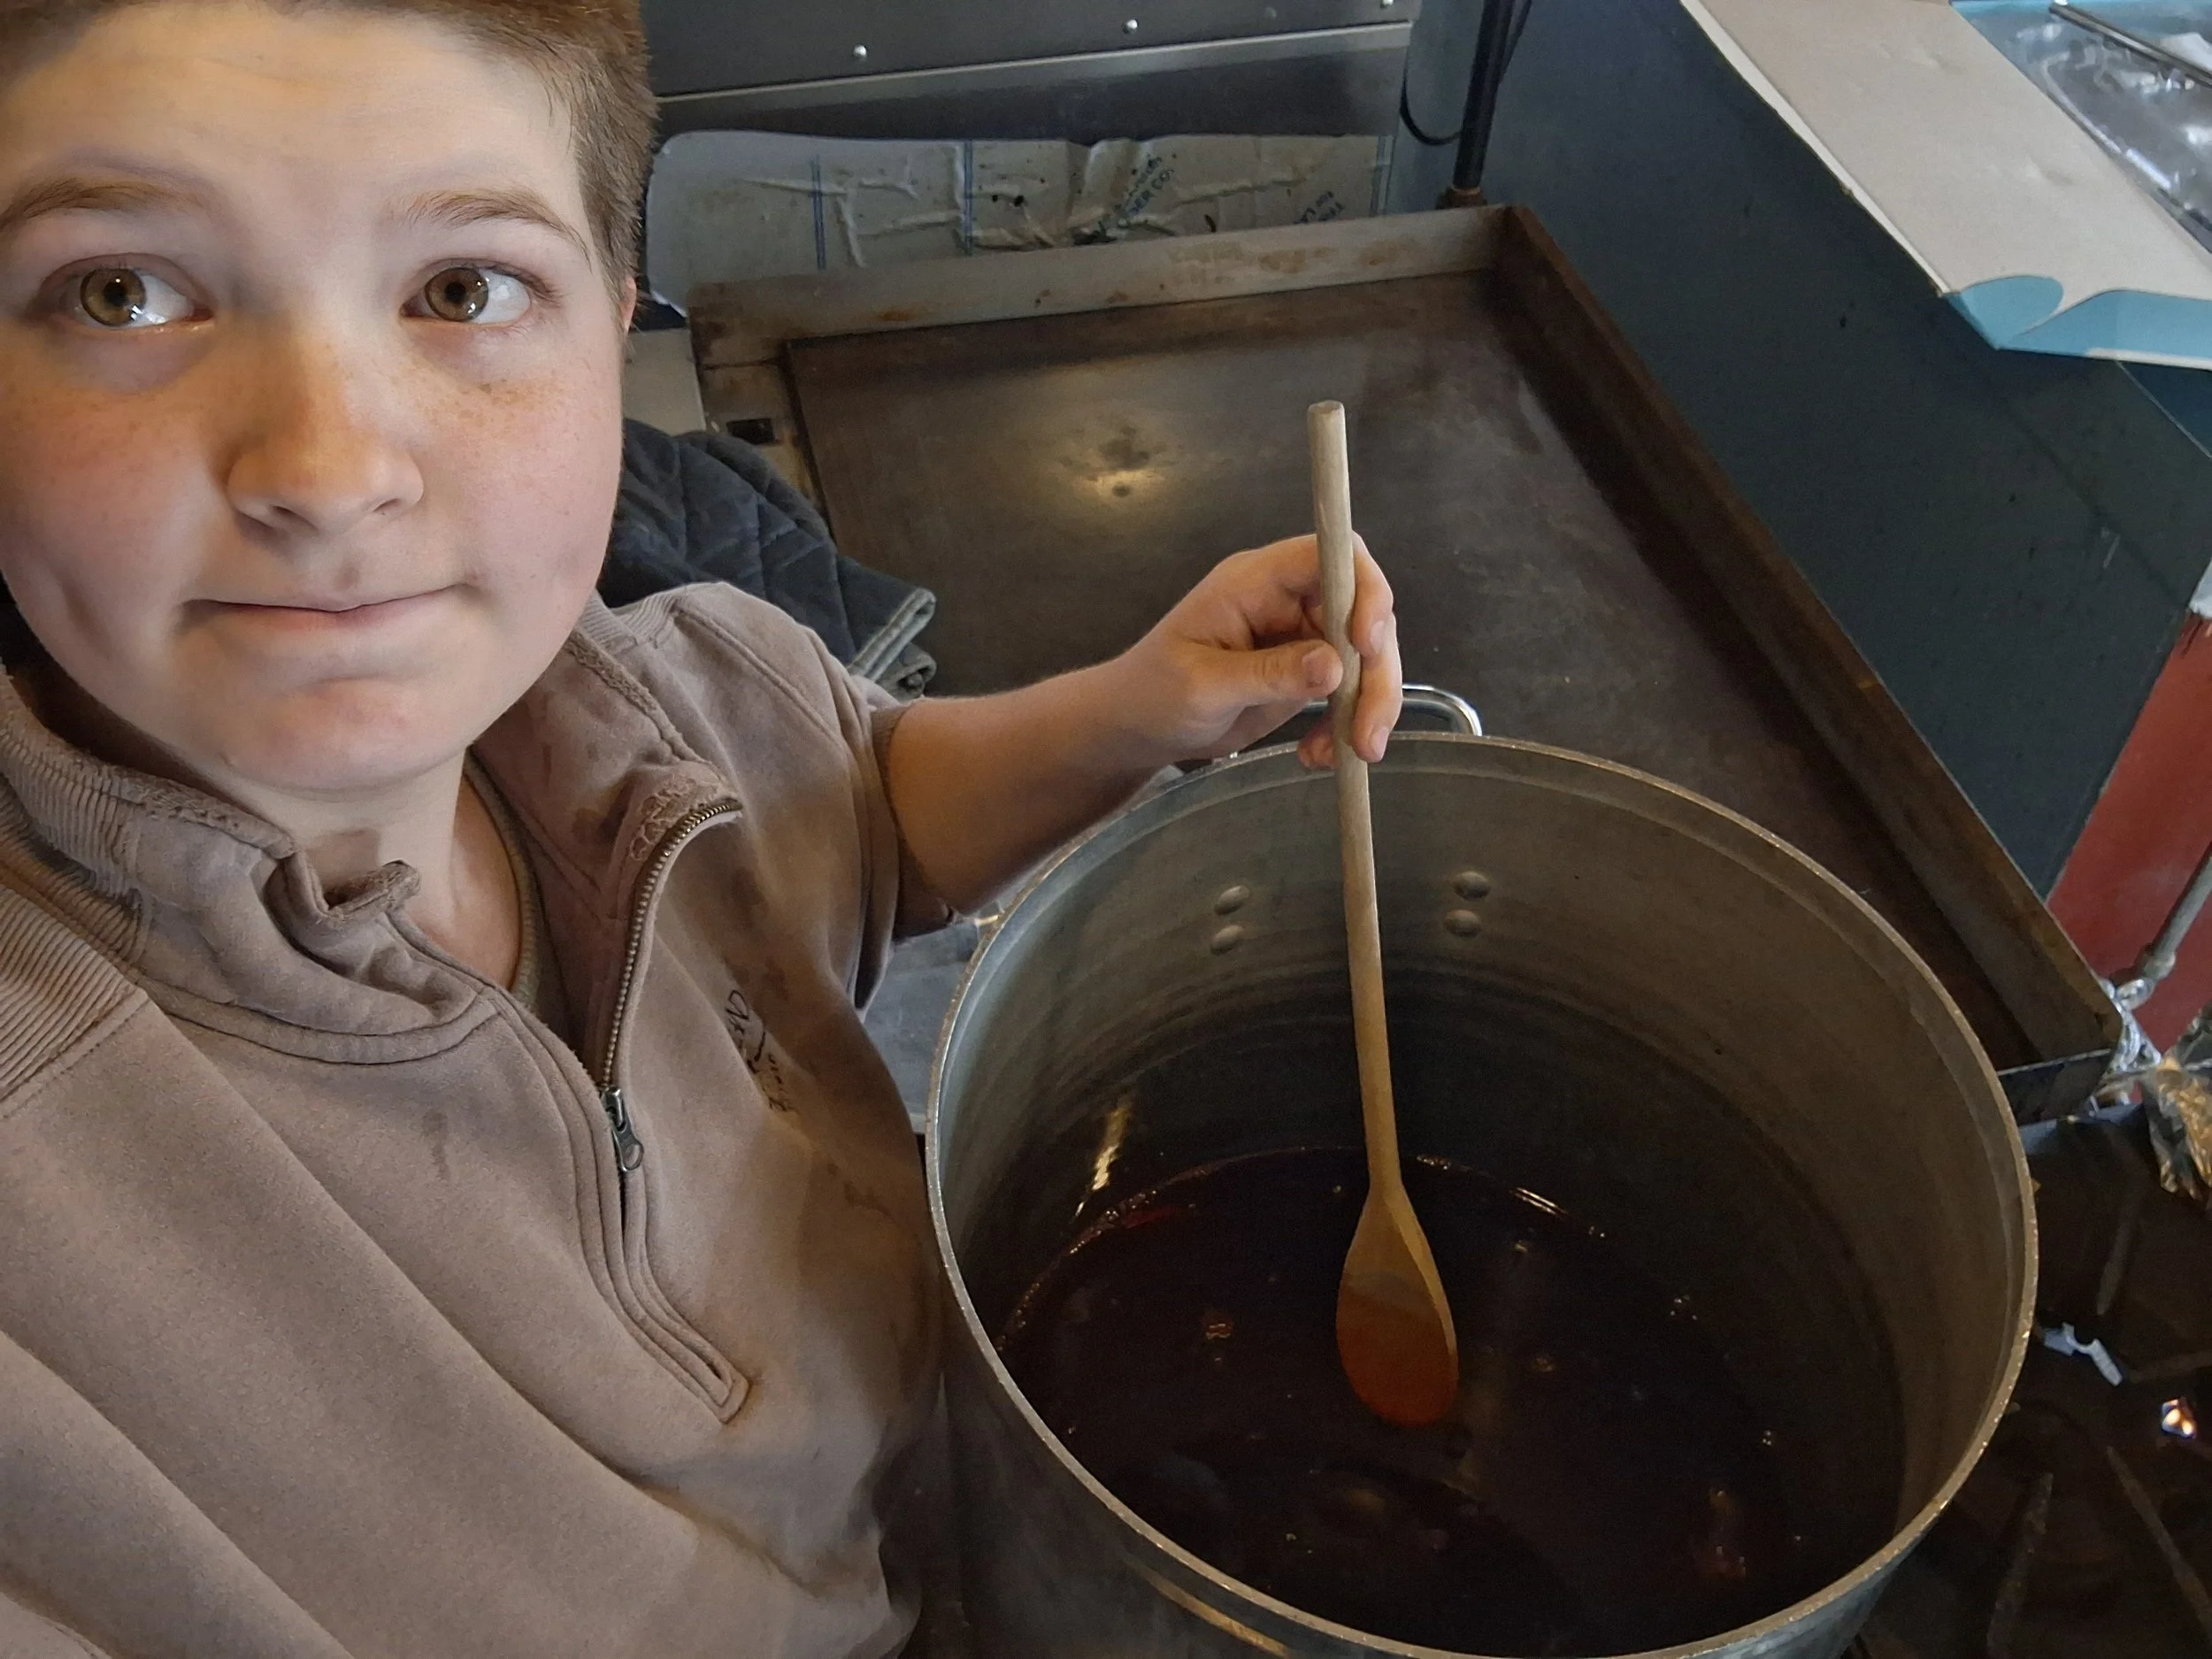
Dot Deininger documents the process of transforming chicken blood into Blood Meal.
In the fertilizer section of every garden store and nursery I've been to, I've seen bags of bone and blood meal to put in your garden. I never bought any and hardly thought about it until I began processing chicken at Luther Glen Farm this summer. In the culling process, we made sure to thank each chicken for the part they played in the world, their environment, and for their community (us!) before slaughter. We saved the feet and the hearts after evisceration to feed our farm dogs, and put the feathers in the compost, but everyone was wondering what to do with the leftover blood.
After we talked about disposing of the blood with the rest of our hazardous chicken waste, someone suggested pouring it into the soil of our roses directly. That immediately reminded me of every bag of blood meal I've ever seen. I volunteered to transform the leftover blood into blood meal despite having no idea what the process is, but knowing that it could be a great way for us to take another step toward sustainability, just like turning chicken entrails into dog treats. Waste not want not, right?
I ended up with two quarts of chicken blood and a phone to ask all of my blood meal making questions to. I learned a lot about the benefits of blood to plants, especially in the form of cooked and dried blood meal. Blood is a nitrogen rich fertilizer and transforming it into meal makes it easier to apply in measured portions in your garden to prevent nitrogen overload in plants, also known as a nitrogen bloom. Too much nitrogen in the soil (or in any ecosystem, this is commonly observed in tropical waters after a storm has brought loads of dead animal material into the sea) can cause a nitrogen bloom, where everything thrives and flowers very quickly and just as quickly dies from the overload. In meal form, it is easier to treat your plants than it is to treat them with straight blood.
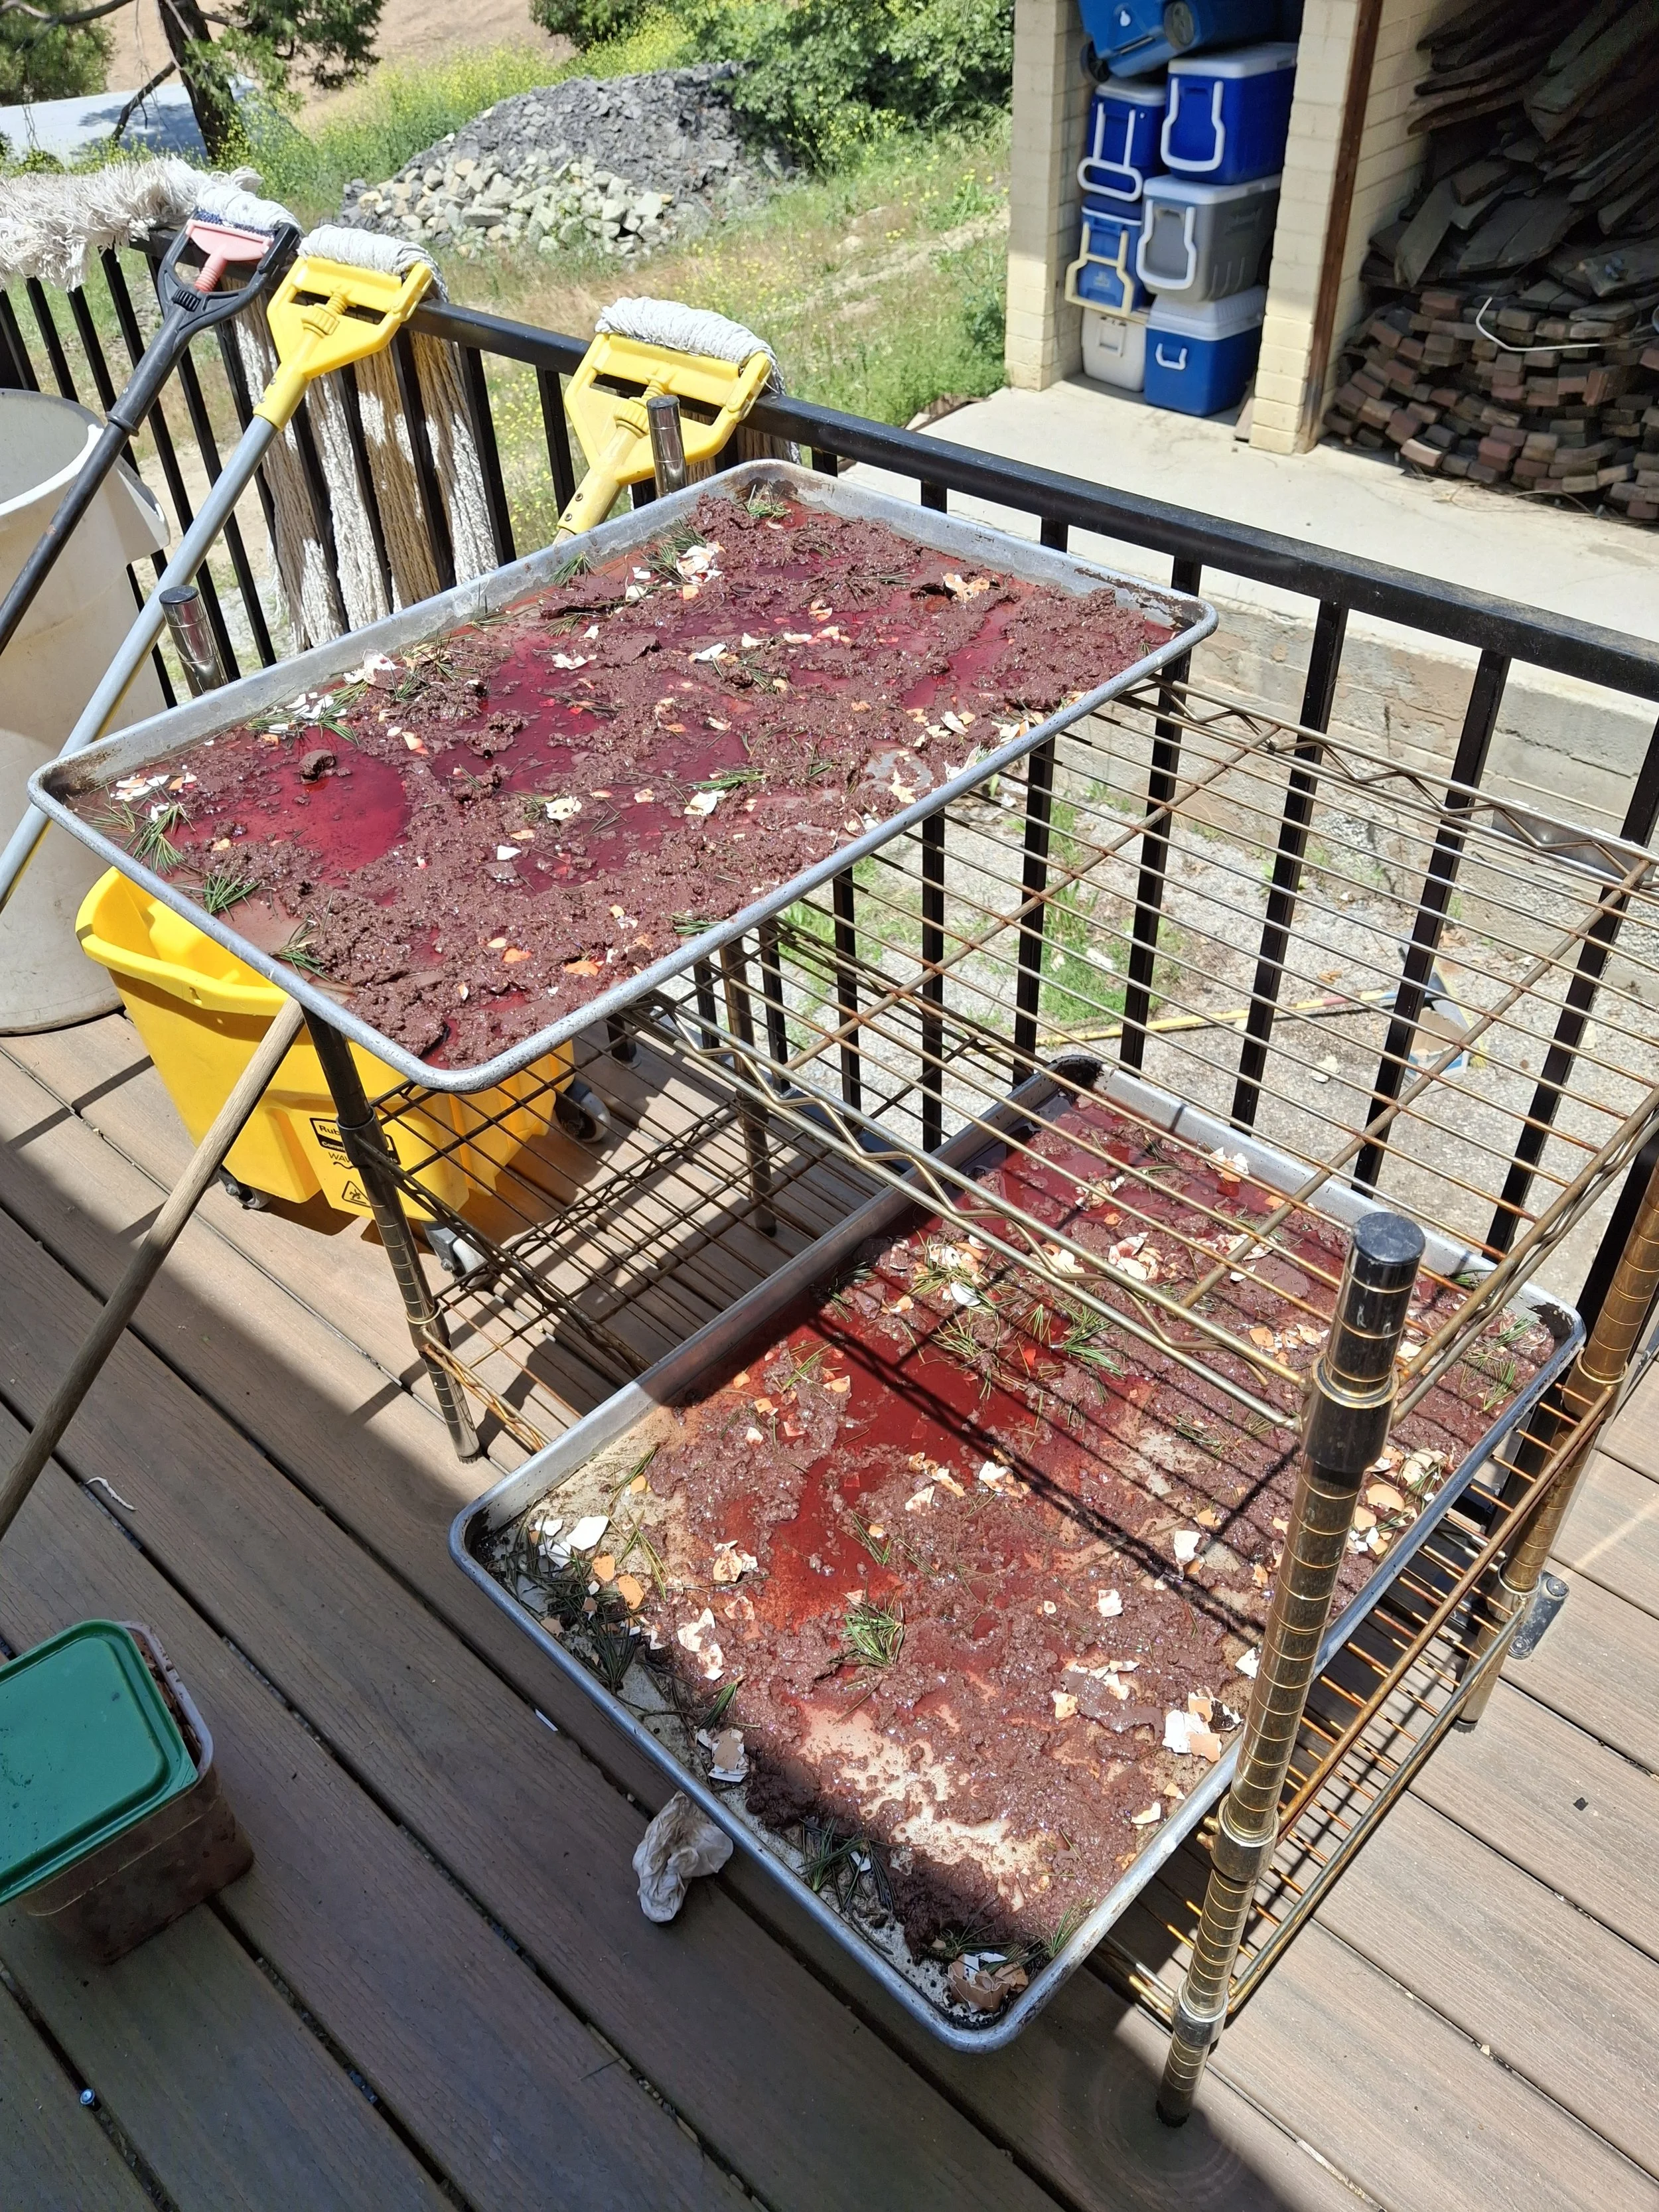
After being cooked, Dot’s Blood Meal dries in the sun.
Cooking the blood also allows your plants to access heat activated proteins that otherwise would not be available for the plants. In short,you get a lot of bang for no buck to repurpose your animal blood into blood meal fertilizer! To begin the process, I had to cook my half gallon of chicken blood until only about 20% of its moisture remained, making sure to continuously stir. I read that it was supposed to turn into a sludge but I wasn't expecting quite the sludge it turned out to be.
I also read that adding organic matter to the trays you sundry your blood onto can help speed the process and make your meal more nutritious for your plants. My readings suggested alfalfa, seaweed, really anything organic and dried up, and so I collected cedar needles, eggshells, and coffee grounds onto two metal trays. I laid the trays in the sun and in three days my blood meal was dried dark black and crumbled at the touch—exactly what I was looking for.
Once done I applied it to some roses that had just been transplanted to give them an extra fertilizing boost by sprinkling a handful onto each plant. Turning leftover blood into a blood meal for plants is surprisingly easy as long as you have a pot to cook it in and a few days of sunshine. It's a great benefit for your garden and a simple way to close a waste loop of your food production and do some repurposing after meat processing. I learned a lot in discovering how to do this myself and I wonder, should Sterling integrate this form of blood composting into its meat processing system? This could be a great learning experience on Work Day in the coming fall, and we could even use what we produce on the garden beds where we grow our graduation flowers every spring!
Blood Meal Recipe
Although I am not an expert on blood meal, I do have years of experience with agriculture and food safety practices in processing animals and plants. I would not recommend making your own blood meal without at least two years of some relevant experience or someone else with that experience to help you.
Be sure to have sanitizing materials and PPE on hand like bleach, gloves, and a disposal. You will be handling raw animal blood and it is essential to be cautious. Always be mindful of bloodborne pathogens and maintain kitchen and food handling safety. Spills while cooking are often inevitable but disease spread is preventable!
What you need:
1 Pot
1 Stirring spoon
1 Part animal blood to each 24×12 inch tray
1 Part assorted organic material that is good for the garden and dry or drying quickly (ex: seaweed, alfalfa, eggshells, coffee grounds, leaves, herb garden prunings, feathers, leaves,) and that can be crushed up to cover your trays.
1 24×12 inch tray
Steps:
Collect your animal blood from a healthy source. If you are processing your own livestock you should already know about the flock or herd, but if you are collecting from a butcher or a farmer make sure to ask questions about if the source was in good health before this blood got into your hands.
Heat your blood in a pot to a boil and keep stirring until it has reduced to about 20% of its original moisture (watch the line where the level of liquid started in the pot and follow it as it evaporates down) and it will turn into a brownish sludge.
Take the pot off of the burner and don't do anything to it yet.
Have one 24×12 tray for every one part of animal blood. Each tray should have one part of dry or drying organic matter spread across the tray. Note: This extra material helps to thin out the sludge on the tray and also absorbs and dries with some of the nutrients in blood that will otherwise be lost in the sun drying method.
Pour the bludge (blood + sludge) onto the trays and set trays in the sun (try to find somewhere you think they're less likely to be found by animals.) Make sure it is a thin layer that will dry quickly, it smells like meat and is likely to attract animals. You can also dry the trays in an oven, the blood has been cooked at this point already and does not produce an offensive smell.
Once the bludge has had about two or three days in the sun it should turn black and crumble at a touch.
Once fully dried, it is ready to scoop onto plants to help them have new leafy growth by aiding in photosynthesis (and much more!)


